
zabbix+tidb
实验前准备
需要用到的软件包
[root@tidb1 ~]# ls

centos-release-scl-2-3.el7.centos.noarch.rpm     mysql-community-devel-5.7.33-1.el7.x86_64.rpm            mysql-community-libs-compat-5.7.33-1.el7.x86_64

centos-release-scl-rh-2-3.el7.centos.noarch.rpm  mysql-community-embedded-5.7.33-1.el7.x86_64.rpm         mysql-community-server-5.7.33-1.el7.x86_64.rpm

mysql-5.7.33-1.el7.x86_64.rpm-bundle(1).tar      mysql-community-embedded-compat-5.7.33-1.el7.x86_64.rpm  mysql-community-test-5.7.33-1.el7.x86_64.rpm

mysql-community-client-5.7.33-1.el7.x86_64.rpm   mysql-community-embedded-devel-5.7.33-1.el7.x86_64.rpm   tidb-latest-linux-amd64.tar.gz

mysql-community-common-5.7.33-1.el7.x86_64.rpm   mysql-community-libs-5.7.33-1.el7.x86_64.rpm
![]()
需要三台主机部署tidb
- 推荐安装 CentOS 7.3 及以上版本
- 运行环境可以支持互联网访问,用于下载 TiDB 及相关软件安装包
| 实例 | 个数 | IP | 配置 |
|---|---|---|---|
| TiKV | 2 | 192.168.2.20 192.168.2.20 |
避免端口和目录冲突 |
| PD | 1 | 192.168.2.10 | 默认端口
全局目录配置 |
部署主机软件和环境要求
- 部署需要使用部署主机的 root 用户及密码
- 部署主机或者开放 TiDB 集群的节点间所需端口
- 目前 TiUP 支持在 x86_64(AMD64 和 ARM)架构上部署 TiDB 集群
- 在 AMD64 架构下,建议使用 CentOS 7.3 及以上版本 Linux 操作系统
- 在 ARM 架构下,建议使用 CentOS 7.6 1810 版本 Linux 操作系统
一 ,部署安装zabbbix
建议参考官方文档:www.zabbix.com
1.1 安装zabbix存储库
[root@tidb1 ~]# rpm -Uvh https://repo.zabbix.com/zabbix/5.0/rhel/7/x86_64/zabbix-release-5.0-1.el7.noarch.rpm

Retrieving https://repo.zabbix.com/zabbix/5.0/rhel/7/x86_64/zabbix-release-5.0-1.el7.noarch.rpm

warning: /var/tmp/rpm-tmp.gefVff: Header V4 RSA/SHA512 Signature, key ID a14fe591: NOKEY

Preparing...                          ################################# [100%]

Updating / installing...

   1:zabbix-release-5.0-1.el7         ################################# [100%]
![]()

![]()
1.2 安装zabbix服务器和代理
[root@tidb1 ~]# yum install zabbix-server-mysql zabbix-agent

Loaded plugins: product-id, search-disabled-repos, subscription-manager

......

Dependency Installed:

  OpenIPMI-libs.x86_64 0:2.0.23-2.el7    OpenIPMI-modalias.x86_64 0:2.0.23-2.el7   fping.x86_64 0:3.16-1.el7        libevent.x86_64 0:2.0.21-4.el7

  libtool-ltdl.x86_64 0:2.4.2-22.el7_3   net-snmp-libs.x86_64 1:5.7.2-37.el7       unixODBC.x86_64 0:2.3.1-11.el7


Complete!
![]()

![]()
1.3 安装zabbix前端
[root@tidb1 ~]# yum install centos-release-scl-2-3.el7.centos.noarch.rpm centos-release-scl-rh-2-3.el7.centos.noarch.rpm -y

Loaded plugins: product-id, search-disabled-repos, subscription-manager

This system is not registered with an entitlement server. You can use subscription-manager to register.

......

Installed:

  centos-release-scl.noarch 0:2-3.el7.centos                              centos-release-scl-rh.noarch 0:2-3.el7.centos


Complete!
![]()

![]()
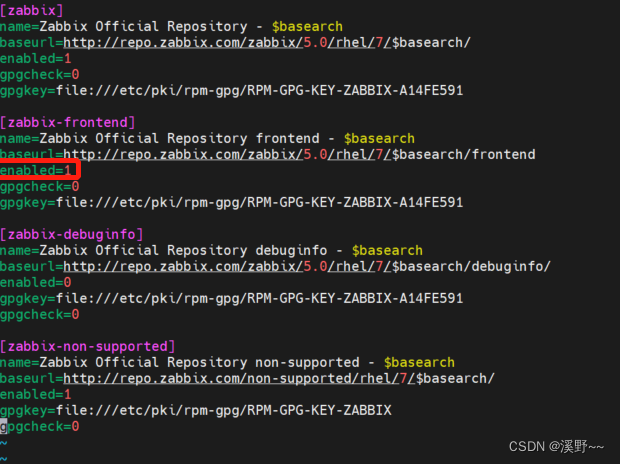
1.4 编辑配置文件 /etc/yum.repos.d/zabbix.repo
[root@tidb1 ~]# vim /etc/yum.repos.d/zabbix.repo

[zabbix-frontend]

...

enabled=1

...
![]()
![]()
1.4 安装zabbix前端包
[root@tidb1 ~]#   yum install zabbix-web-mysql-scl zabbix-apache-conf-scl -y

Loaded plugins: langpacks, product-id, search-disabled-repos, subscription-manager

This system is not registered with an entitlement server. You can use subscription-manager to register.

centos-sclo-rh                                                                                                                                                  | 3.0 kB  00:00:00

centos-sclo-sclo                                                                                                                                                | 3.0 kB  00:00:00

(1/2): centos-sclo-sclo/x86_64/primary_db                                                                                                                       | 300 kB  00:00:00

(2/2): centos-sclo-rh/x86_64/primary_db                                                                                                                         | 3.4 MB  00:00:00

......

Complete!
![]()

![]()
2. 创建初始数据库
2.1 下载数据库
[root@tidb1 ~]# yum install mysql-community-client-5.7.33-1.el7.x86_64.rpm mysql-community-common-5.7.33-1.el7.x86_64.rpm mysql-community-libs-5.7.33-1.el7.x86_64.rpm mysql-community-                       libs-compat-5.7.33-1.el7.x86_64.rpm mysql-community-server-5.7.33-1.el7.x86_64.rpm -y

Loaded plugins: langpacks, product-id, search-disabled-repos, subscription-manager

This system is not registered with an entitlement server. You can use subscription-manager to register.

Examining mysql-community-client-5.7.33-1.el7.x86_64.rpm: mysql-community-client-5.7.33-1.el7.x86_64

......

Complete!
![]()

![]()
2.2 登录数据库,更改密码
[root@tidb1 ~]# systemctl start mysqld
[root@tidb1 ~]# cat /var/log/mysqld.log ##查看数据库初始密码
.......
2022-07-11T04:47:54.505655Z 1 [Note] A temporary password is generated for root@localhost: ,dBiE-U>J29-
......
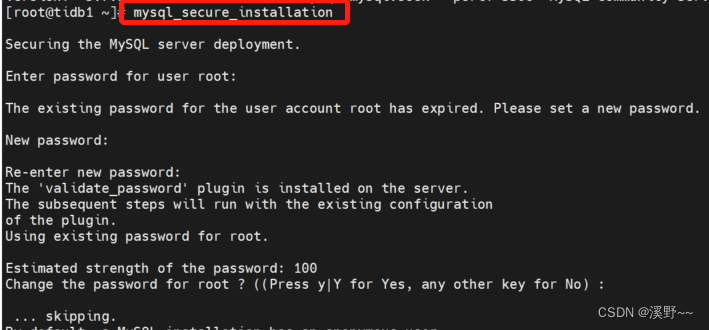
[root@tidb1 ~]# mysql_secure_installation
Securing the MySQL server deployment.
Enter password for user root: ##输入日志里面的初始化密码
The existing password for the user account root has expired. Please set a new password.
New password: ##输入自己新建数据库的密码
Re-enter new password: ##确认新建密码
The 'validate_password' plugin is installed on the server.
The subsequent steps will run with the existing configuration
of the plugin.
Using existing password for root.
Estimated strength of the password: 100
Change the password for root ? ((Press y|Y for Yes, any other key for No) :
.......
All done!
![]()

![]()
![]()
2.3 初始化数据库
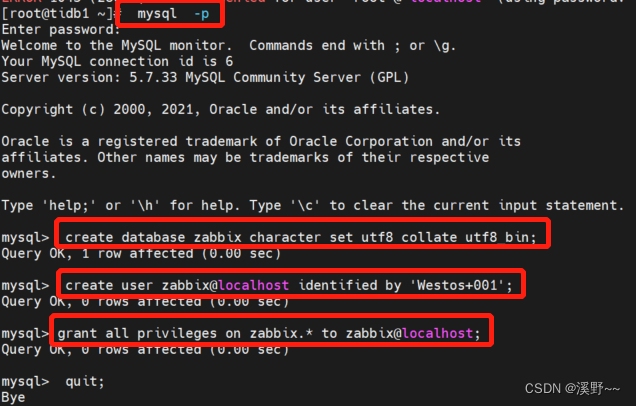
[root@tidb1 ~]#  mysql  -p

Enter password:

Welcome to the MySQL monitor.  Commands end with ; or \g.

Your MySQL connection id is 6

Server version: 5.7.33 MySQL Community Server (GPL)


Copyright (c) 2000, 2021, Oracle and/or its affiliates.


Oracle is a registered trademark of Oracle Corporation and/or its

affiliates. Other names may be trademarks of their respective

owners.


Type 'help;' or '\h' for help. Type '\c' to clear the current input statement.


mysql>  create database zabbix character set utf8 collate utf8_bin;   ##创建数据库zabbix

Query OK, 1 row affected (0.00 sec)


mysql>  create user zabbix@localhost identified by 'Westos+001';      ##创建zabbix用户及密码

Query OK, 0 rows affected (0.00 sec)


mysql> grant all privileges on zabbix.* to zabbix@localhost;          ##授权

Query OK, 0 rows affected (0.00 sec)


mysql>  quit;                                                         ##退出

Bye
![]()
![]()
2.4 导入初始架构和数据,系统将提示您输入新创建的密码。(时间稍微有点长,切记不要退出)
[root@tidb1 ~]# zcat /usr/share/doc/zabbix-server-mysql*/create.sql.gz | mysql -uzabbix -p zabbix

Enter password:               ##输入建立数据库的密码
![]()
![]()
![]()
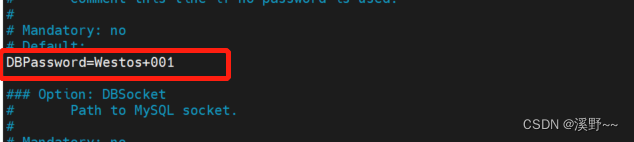
3. 为Zabbix server配置数据库,编辑配置文件 /etc/zabbix/zabbix_server.conf
.....

DBPassword=Westos+001    ##改成数据库密码

.....
![]()
![]()
4 . 为Zabbix前端配置PHP, 编辑配置文件 /etc/opt/rh/rh-php72/php-fpm.d/zabbix.conf
php_value[date.timezone] = Asia/Shanghai
![]()

![]()
5. 启动Zabbix server和agent进程,并为它们设置开机自启
# systemctl restart zabbix-server zabbix-agent httpd rh-php72-php-fpm

# systemctl enable zabbix-server zabbix-agent httpd rh-php72-php-fpm
![]()

![]()
至此,zabbix就配置好了
二, 安装tidb数据库
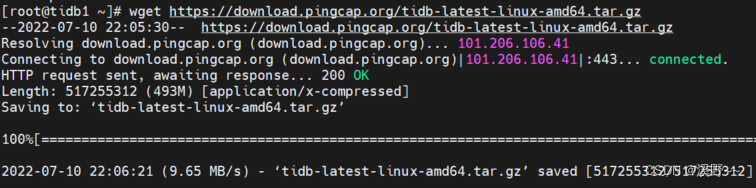
2.1 从官网下载tidb包
[root@tidb1 ~]# wget https://download.pingcap.org/tidb-latest-linux-amd64.tar.gz

--2022-07-10 22:05:30--  https://download.pingcap.org/tidb-latest-linux-amd64.tar.gz

Resolving download.pingcap.org (download.pingcap.org)... 101.206.106.41

Connecting to download.pingcap.org (download.pingcap.org)|101.206.106.41|:443... connected.

HTTP request sent, awaiting response... 200 OK

Length: 517255312 (493M) [application/x-compressed]

Saving to: ‘tidb-latest-linux-amd64.tar.gz’


100%[=============================================================================================================================================>] 517,255,312 11.0MB/s   in 51s


2022-07-10 22:06:21 (9.65 MB/s) - ‘tidb-latest-linux-amd64.tar.gz’ saved [517255312/517255312]
![]()
![]()
2.2 解压tidb-latest-linux-amd64.tar.gz
[root@tidb1 ~]# tar zxf tidb-latest-linux-amd64.tar.gz

[root@tidb1 ~]# ls

centos-release-scl-2-3.el7.centos.noarch.rpm     mysql-community-devel-5.7.33-1.el7.x86_64.rpm            mysql-community-libs-compat-5.7.33-1.el7.x86_64.rpm

centos-release-scl-rh-2-3.el7.centos.noarch.rpm  mysql-community-embedded-5.7.33-1.el7.x86_64.rpm         mysql-community-server-5.7.33-1.el7.x86_64.rpm

mysql-5.7.33-1.el7.x86_64.rpm-bundle(1).tar      mysql-community-embedded-compat-5.7.33-1.el7.x86_64.rpm  mysql-community-test-5.7.33-1.el7.x86_64.rpm

mysql-community-client-5.7.33-1.el7.x86_64.rpm   mysql-community-embedded-devel-5.7.33-1.el7.x86_64.rpm   tidb-latest-linux-amd64.tar.gz

mysql-community-common-5.7.33-1.el7.x86_64.rpm   mysql-community-libs-5.7.33-1.el7.x86_64.rpm             tidb-v5.0.1-linux-amd64

[root@tidb1 ~]# cd tidb-v5.0.1-linux-amd64/
![]()
2.3 开启PD打入后台
[root@tidb1 ~]# cd tidb-v5.0.1-linux-amd64/

[root@tidb1 tidb-v5.0.1-linux-amd64]# ./bin/pd-server --name=pd1 --data-dir=pd1 --client-urls="http://192.168.2.10:2379" --peer-urls="http://192.168.2.10:2380" --initial-cluster="pd1=                       http://192.168.2.10:2380" --log-file=pd.log &

[1] 19489
![]()
2.4 配置另外两台TIKV,两台TIKV配置操作相同
[root@tidb2 ~]#  tar zxf tidb-latest-linux-amd64.tar.gz

[root@tidb2 ~]# cd tidb-v5.0.1-linux-amd64/

[root@tidb2 tidb-v5.0.1-linux-amd64]#  ./bin/tikv-server --pd="192.168.2.10:2379" --addr="192.168.2.20:20160" --data-dir=tikv1 --log-file=tikv.log &

[1] 9289

[root@tidb2 tidb-v5.0.1-linux-amd64]#  netstat -antlp | grep tikv

tcp        0      0 127.0.0.1:20180         0.0.0.0:*               LISTEN      9289/./bin/tikv-ser

tcp6       0      0 192.168.2.20:20160      :::*                    LISTEN      9289/./bin/tikv-ser

tcp6       0      0 192.168.2.20:33734      192.168.2.10:2379       ESTABLISHED 9289/./bin/tikv-ser
![]()

![]()
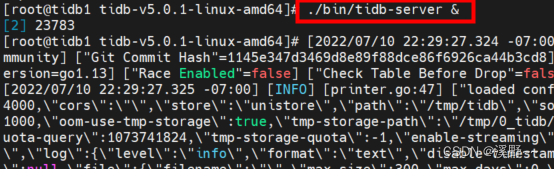
2.5 将tidb服务打入后台
[root@tidb1 tidb-v5.0.1-linux-amd64]# ./bin/tidb-server &
![]()
![]()
2.6 查看两台KITV连接情况及4000端口是否开启

![]()
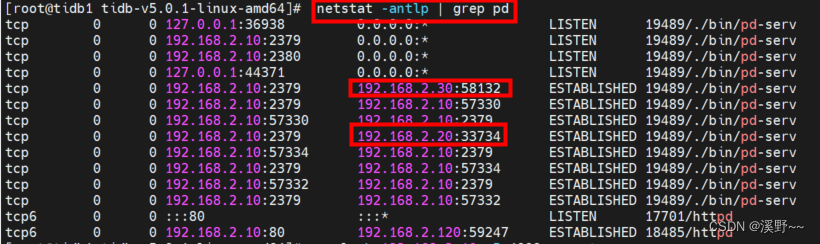
![]()
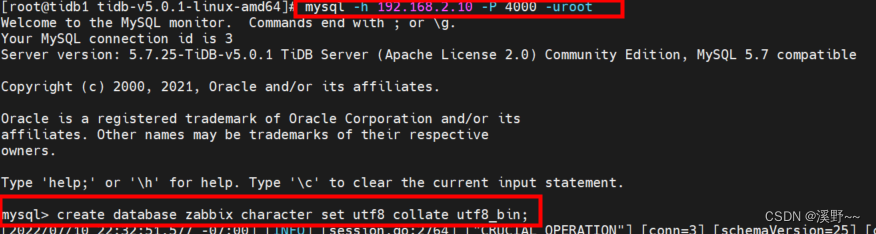
2.7 进入zabbix数据库 创建zabbix用户并设定权限
[root@tidb1 tidb-v5.0.1-linux-amd64]# mysql -h 192.168.2.10 -P 4000 -uroot

mysql> create database zabbix character set utf8 collate utf8_bin;

mysql> CREATE USER 'zabbix'@'%' IDENTIFIED BY 'Westos+001';

grant all privileges on *.* to 'zabbix'@'%';
![]()
![]()
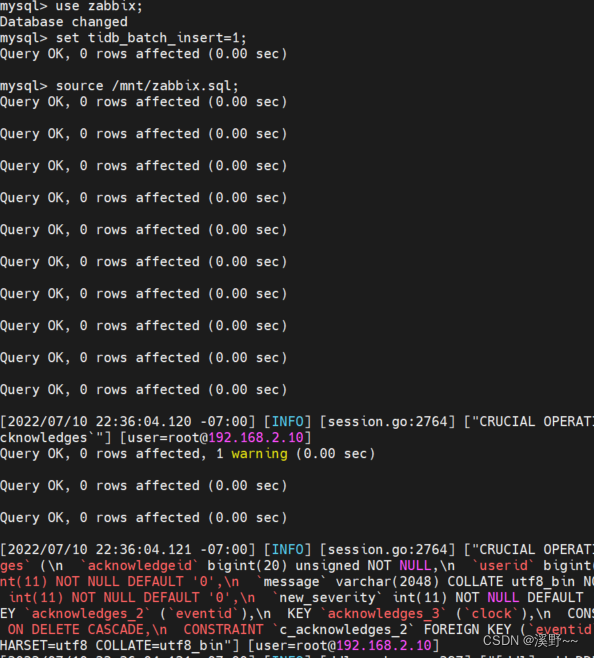
2.8 TiDB数据库备份 , 导入(时间会比较长,导入的数据很多,不是报错了)
[root@tidb1 zabbix-server-mysql-5.0.25]# mysqldump -uroot -pWestos+001 zabbix >

 /mnt/zabbix.sql        ##数据库备份

mysqldump: [Warning] Using a password on the command line interface can be insecure.

[root@tidb1 zabbix-server-mysql-5.0.25]# cd /mnt

[root@tidb1 mnt]# ls

zabbix.sql

[root@tidb1 mnt]# mysql -h 192.168.2.10 -P 4000 -uroot

mysql> use zabbix;

Database changed

mysql> set tidb_batch_insert=1;

Query OK, 0 rows affected (0.00 sec)


mysql> source /mnt/zabbix.sql;

Query OK, 0 rows affected (0.00 sec)


Query OK, 0 rows affected (0.00 sec)


Query OK, 0 rows affected (0.00 sec)


Query OK, 0 rows affected (0.00 sec)


Query OK, 0 rows affected (0.00 sec)


Query OK, 0 rows affected (0.00 sec)


Query OK, 0 rows affected (0.00 sec)


Query OK, 0 rows affected (0.00 sec)


Query OK, 0 rows affected (0.00 sec)


Query OK, 0 rows affected (0.00 sec)

.........
![]()
![]()
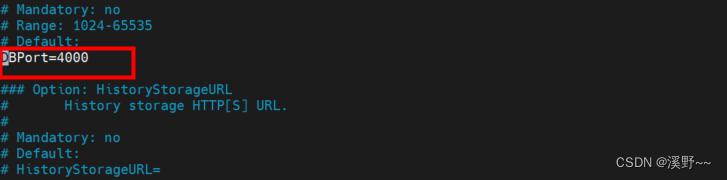
2.9 编辑zabbix的配置文件/etc/zabbix/zabbix_server.conf,将4000端口加进去
[root@tidb1 mnt]# vim /etc/zabbix/zabbix_server.conf

......

DBPort=4000

......
![]()
![]()
2.10 编辑配置文件/etc/zabbix/web/,更改为pd主机IP及端口还有数据库密码
[root@tidb1 php-fpm.d]# vim /etc/zabbix/web/zabbix.conf.php

<?php

// Zabbix GUI configuration file.


$DB['TYPE']                             = 'MYSQL'

$DB['SERVER']                   = '192.168.2.10';

$DB['PORT']                             = '4000';

$DB['DATABASE']                 = 'zabbix';

$DB['USER']                             = 'zabbix';

$DB['PASSWORD']                 = 'Westos+001';

..........
![]()
2.11 重启Zabbix server和agent
[root@tidb1 web]# systemctl restart zabbix-agent

[root@tidb1 web]# systemctl restart zabbix-server
![]()
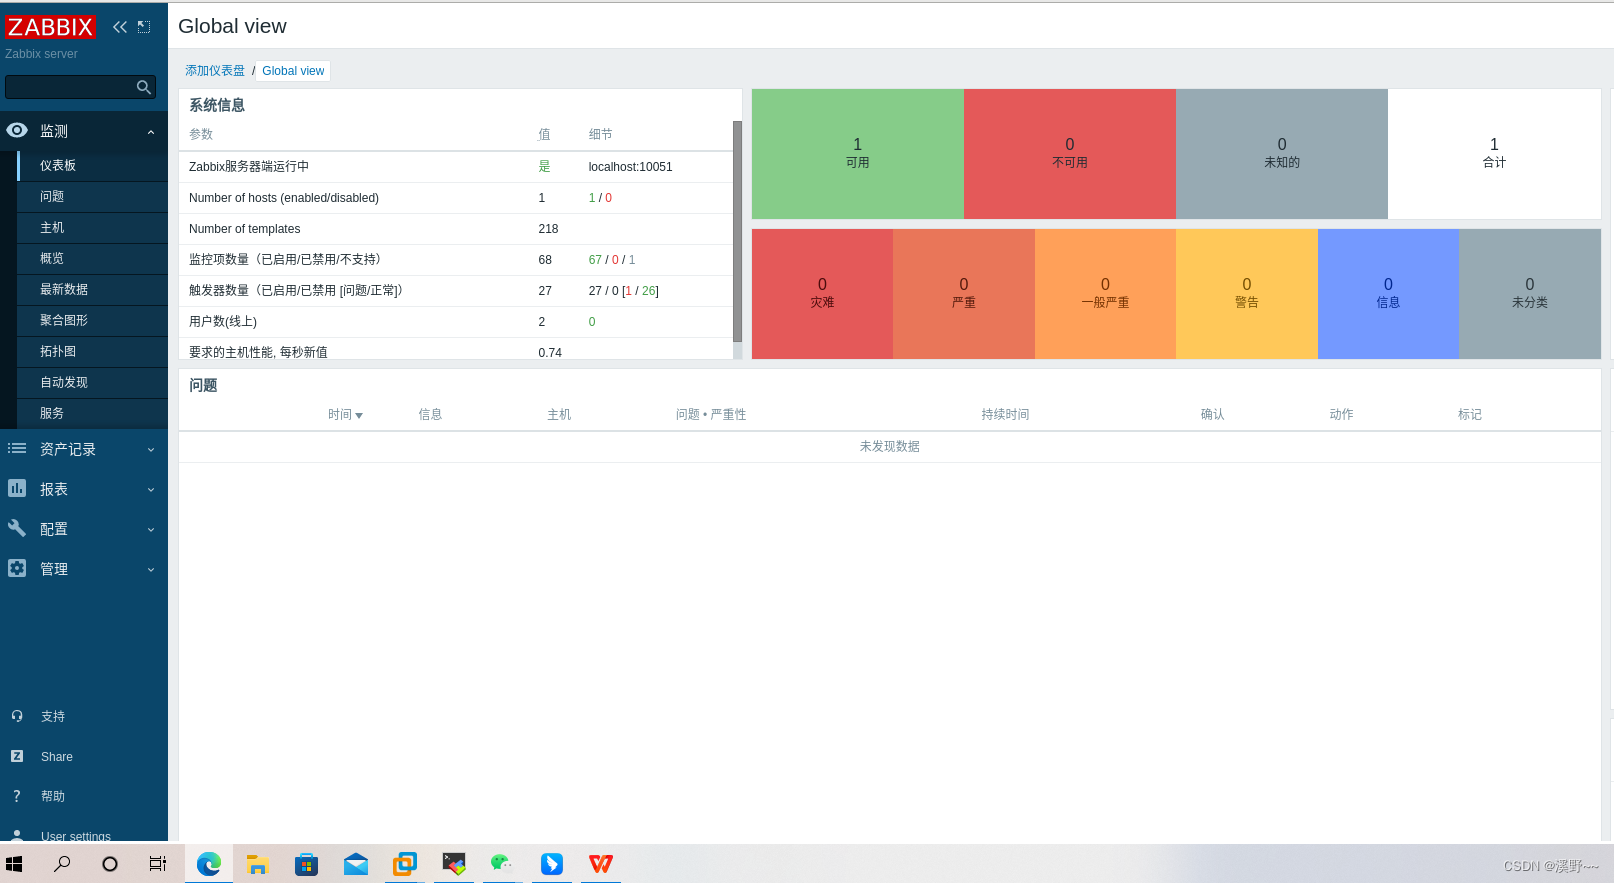
三 启动并访问zabbix
在浏览器输入192.168.2.10/zabbiz可以正常访问说明zabbix配置文件没问题,zabbix的数据库可以正常写入tidb说明zabbix+tidb部署成功
![]()


